SSL certificates are used to secure our website and encrypt the details sent to the server.
We will use a free self-signed SSL certificate and configure the SSL certificate using the NGINX web server.
We need the oracle Linux cloud instance and NGINX server up and running. This step is prerequisite for this tutorial.
Please refer to below link to install the oracle Linux and NGINX server.
https://www.tech4learners.com/2022/01/how-to-create-linux-instance-with-24-gb.html
https://www.tech4learners.net/2022/01/install-nginx-web-server-in-linux-cloud.html
Once your compute instance and NGINX are up and running, proceed with the following steps.
First step is to create PRIVATE / PUBLIC keys using the openssl command.
We are using the RSA algorithm as an encryption method.
Replace the <IP_ADDRESS> with your Linux instance IP ADDRESS.
sudo openssl req -new -x509 -days 30 -nodes -newkey rsa:2048 -keyout private.key \-out public.crt -subj '/C=US/ST=Ca/L=Sunnydale/CN=<IP_ADDRESS>'
Next, We need to create a 'private' directory under the location /etc/pki/nginx.
sudo mkdir -p /etc/pki/nginx/private
Copy the private key to the newly created 'private' folder using the below command.
sudo cp private.key /etc/pki/nginx/private
Copy the public key to the location /etc/pki/nginx using the below command.
sudo cp public.crt /etc/pki/nginx/
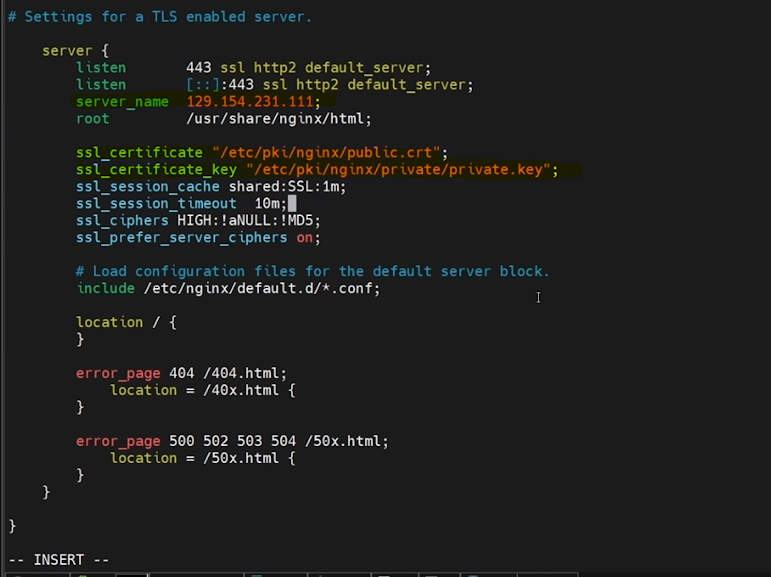
We need to provide the PUBLIC/PRIVATE key path in the NGINX.conf file.
NGINX.CONF file is located in \etc\nginx folder.
Open the NGINX.CONF file using vim editor.
sudo vim nginx.conf
You can see two sets of configurations.
One is for HTTP connections, and another one is for HTTPS connections.
We need to update both.
HTTPS/TLS connection settings will be commented by default.
Remove the # and uncomment it.
Update the server name using your Linux instance IP.
Update the public key name in the ssl_certificate parameter.
Update private key name in ssl_certificate_key.
Port 443 will be used for HTTPS connections by default.
Next, we need to update the HTTP connection settings.
Update the IP address in the server_name parameter.
Remove the root parameter from the HTTP connection.
Add a new line below the server_name parameter as mentioned below.
return 301 https://$host$request_uri;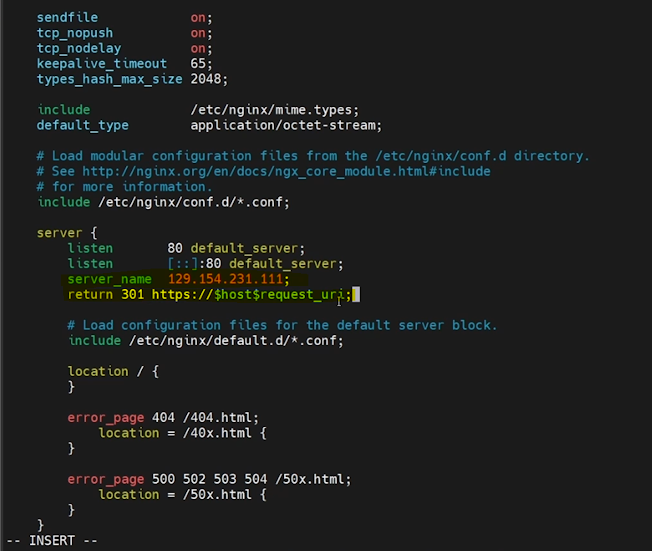
Refer the complete NGINX config file below.
user nginx;
worker_processes auto;
error_log /var/log/nginx/error.log;
pid /run/nginx.pid;

# Load dynamic modules. See /usr/share/nginx/README.dynamic.
include /usr/share/nginx/modules/*.conf;

events {
    worker_connections 1024;
}

http {
    log_format  main  '$remote_addr - $remote_user [$time_local] "$request" '
                      '$status $body_bytes_sent "$http_referer" '
                      '"$http_user_agent" "$http_x_forwarded_for"';

    access_log  /var/log/nginx/access.log  main;

    sendfile            on;
    tcp_nopush          on;
    tcp_nodelay         on;
    keepalive_timeout   65;
    types_hash_max_size 2048;

    include             /etc/nginx/mime.types;
    default_type        application/octet-stream;

    # Load modular configuration files from the /etc/nginx/conf.d directory.
    # See http://nginx.org/en/docs/ngx_core_module.html#include
    # for more information.
    include /etc/nginx/conf.d/*.conf;

    server {
        listen       80 default_server;
        listen       [::]:80 default_server;
        server_name  129.154.231.111;
        return 301 https://$host$request_uri;

        # Load configuration files for the default server block.
        include /etc/nginx/default.d/*.conf;

        location / {
        }

        error_page 404 /404.html;
            location = /40x.html {
        }

        error_page 500 502 503 504 /50x.html;
            location = /50x.html {
        }
    }

# Settings for a TLS enabled server.

    server {
        listen       443 ssl http2 default_server;
        listen       [::]:443 ssl http2 default_server;
        server_name  129.154.231.111;
        root         /usr/share/nginx/html;

        ssl_certificate "/etc/pki/nginx/public.crt";
        ssl_certificate_key "/etc/pki/nginx/private/private.key";
        ssl_session_cache shared:SSL:1m;
        ssl_session_timeout  10m;
        ssl_ciphers HIGH:!aNULL:!MD5;
        ssl_prefer_server_ciphers on;

        # Load configuration files for the default server block.
        include /etc/nginx/default.d/*.conf;

        location / {
        }

        error_page 404 /404.html;
            location = /40x.html {
        }

        error_page 500 502 503 504 /50x.html;
            location = /50x.html {
        }
    }

}
Now all the required configurations are done.
Next, we need to enable the firewall port for HTTPS connections using the below command.
sudo firewall-cmd --add-service=https --permanent

Reload the firewall setting using the below command.
sudo firewall-cmd --reload
Now all the settings are done.
Restart the NGINX server using the below command.
sudo systemctl restart nginx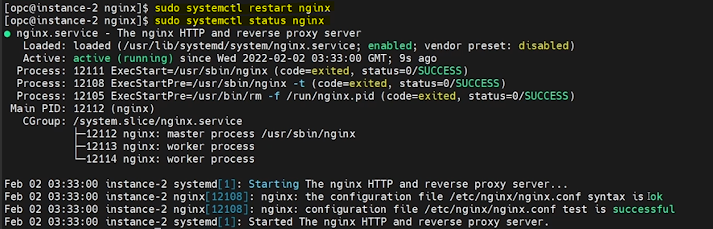
Check the status of the NGINX server after the restart.
sudo systemctl status nginx
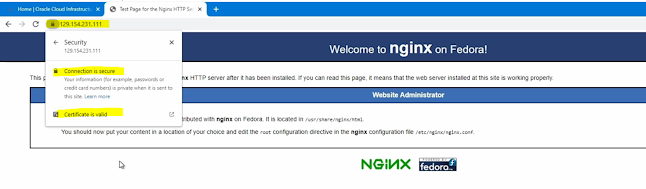
Now go back to the browser and refresh.
You might get a warning first time since we are using a self-signed SSL certificate. However, we will not get any warning If we use SSL certificates from vendors.
Click and accept the warning.
Now you can see default NGINX web page is loaded and connected using a secure HTTPS method.
Please post your questions in your commands.
Please click and subscribe to the below channel to see this tutorial in video format.
https://www.youtube.com/channel/UCtzdDJIXhQX6v3-8iXCJWQw?sub_confirmation=1
Comments
Post a Comment